Combining AWS Lambda and API Gateway allows for you to easily prototype and create endpoints that can plug in to websites, mobile apps and more. You no longer have to worry about maintaining an API and keeping it running when not in use. This combination allows for you to build endpoints at will without the operational overhead of a web service.
Setting up your Lambda Function
The first step is to create a new Lambda function that we can plug a future endpoint into. Navigate to the Lambda home screen as shown below:

Next, click ‘Create a Lambda function’ as is highlighted in the screenshot above. The interface will then ask you for a blueprint - for now let’s just choose Blank Function and fill it in ourselves.
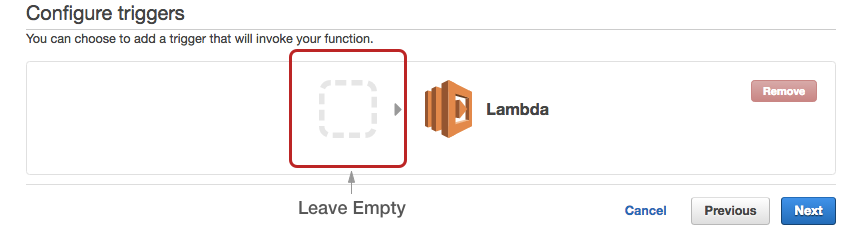
Next up, the wizard will ask you to configure a trigger for your new function. Again, leave it empty for now, and just click next without choosing a trigger, we’ll follow up with this later.
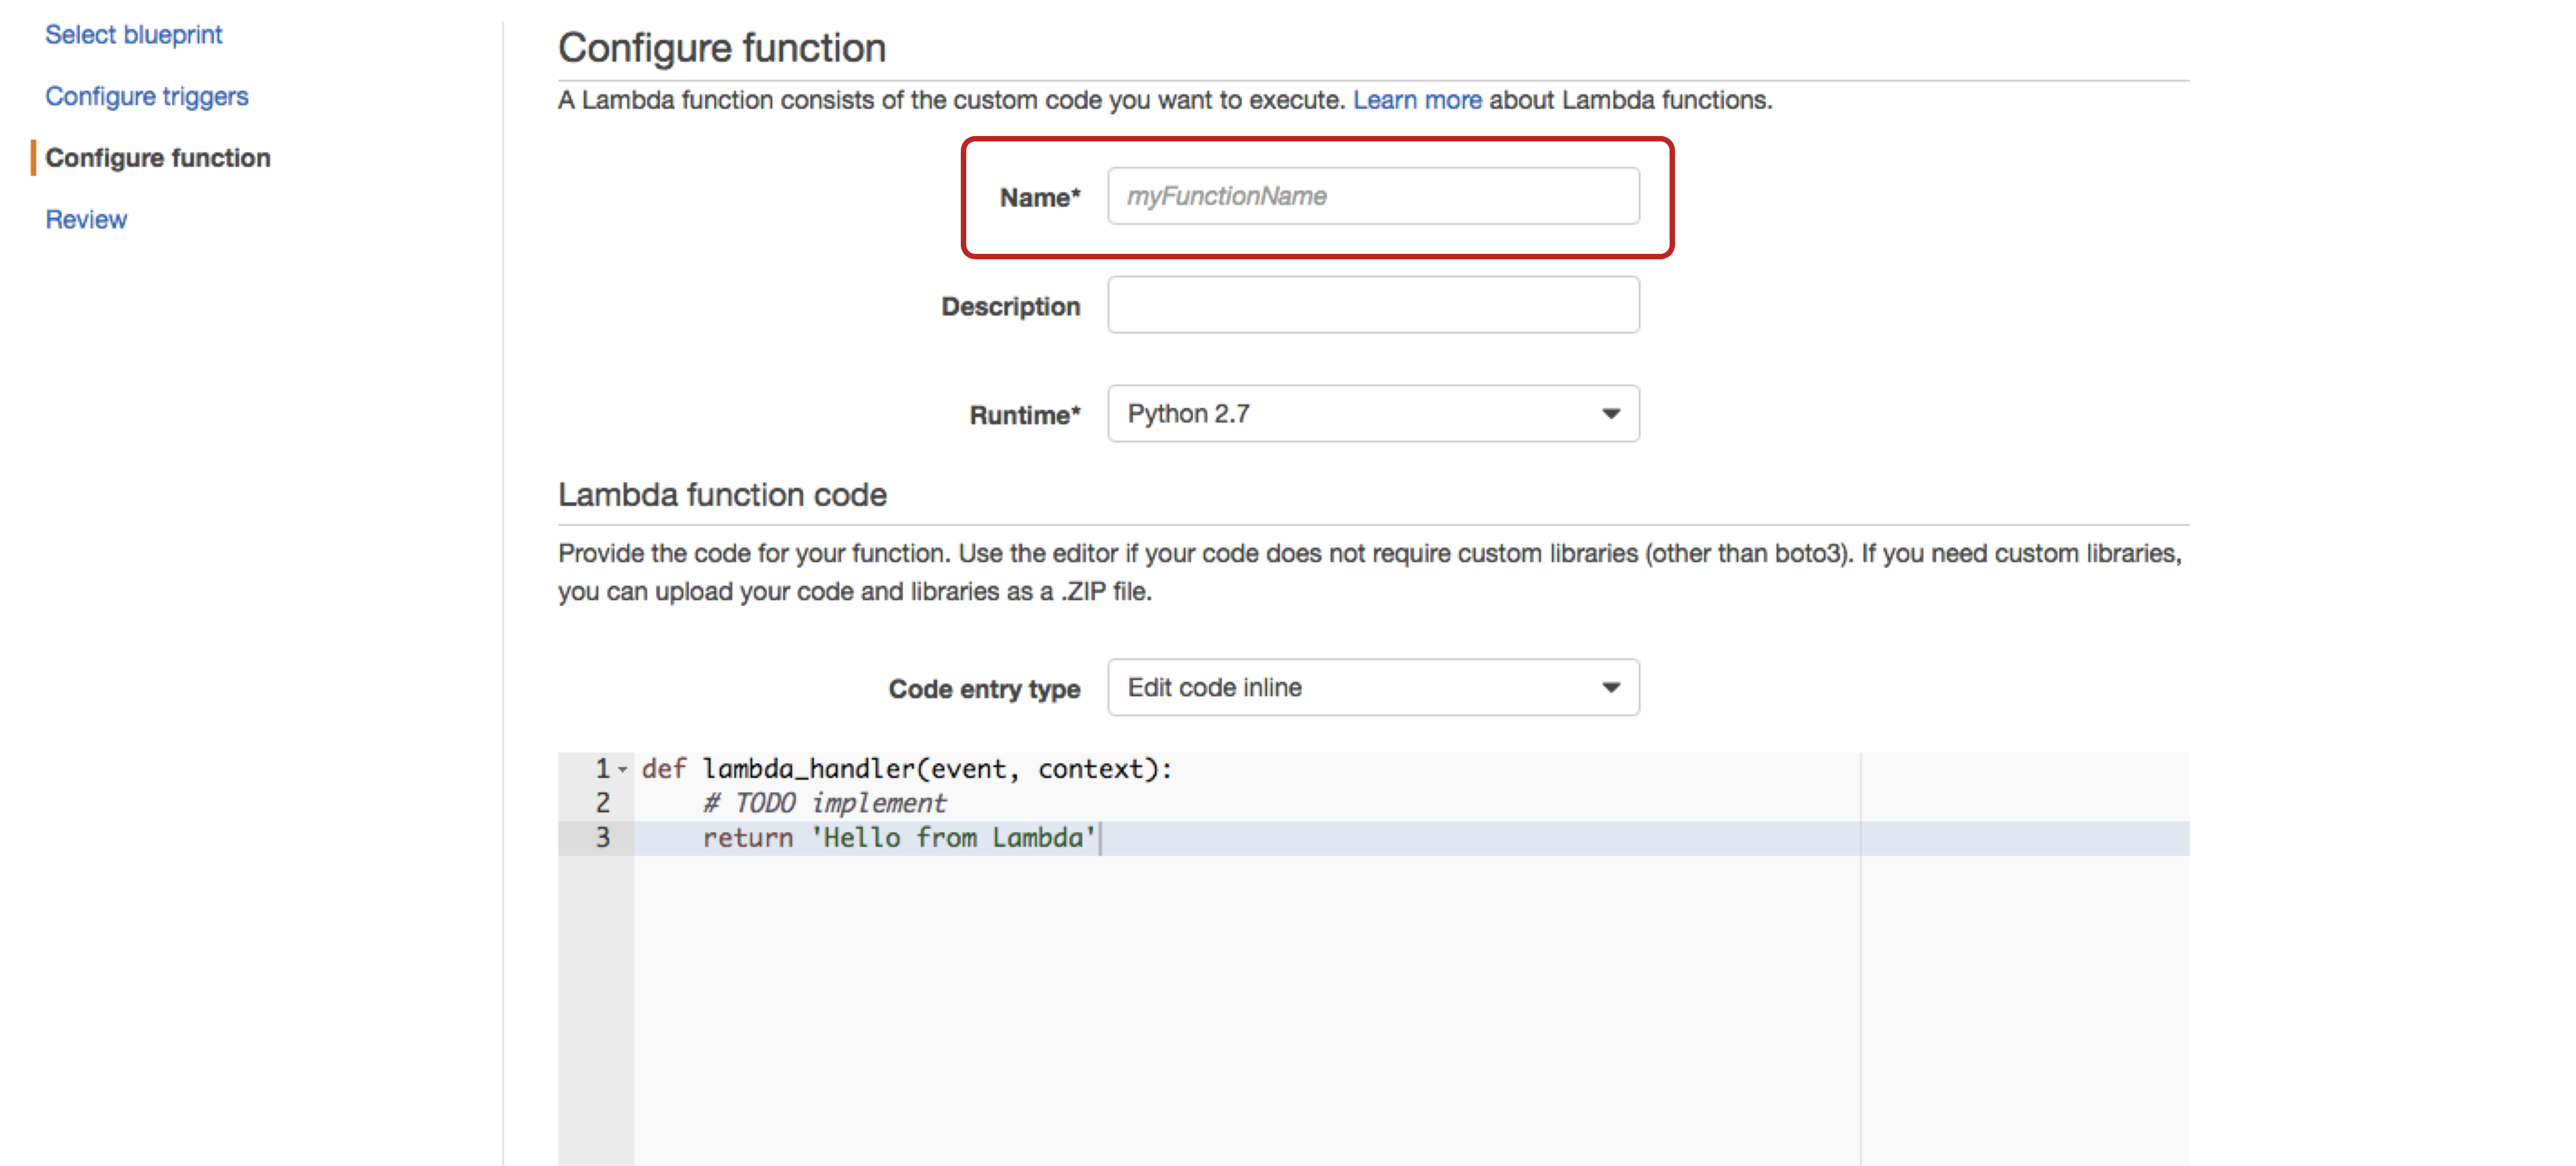
It’s time to fill in our new ‘endpoint’ with some code! For the purpose of keeping this tutorial brief, we shall return some json representing a user. Here’s the example code written for Python 2.7:
import json

def lambda_handler(event, context):

    user_object = {
        "id": 2,
        "username": "geekbob123",
        "karma": 15369,
        "date-created": "04/21/2014"
    }

    return {
        'statusCode': 200,
        'headers': { 'Content-Type': 'application/json' },
        'body': json.dumps(user_object)
    }
As you can see, the final object returned has a little bit more compared to user structure by itself. In order for the API Gateway to properly process a function’s output, the object returned needs to have a dictionary with these three keys at least. Without them, your function will run normally by itself, but will fail when used in tandem with the gateway.
Another key point here, the body attribute must be a string. That’s why I use json.dumps here to convert the user object we created into a JSON-formatted string. If you try to put in the native Python dictionary, this will also cause the gateway to fail.
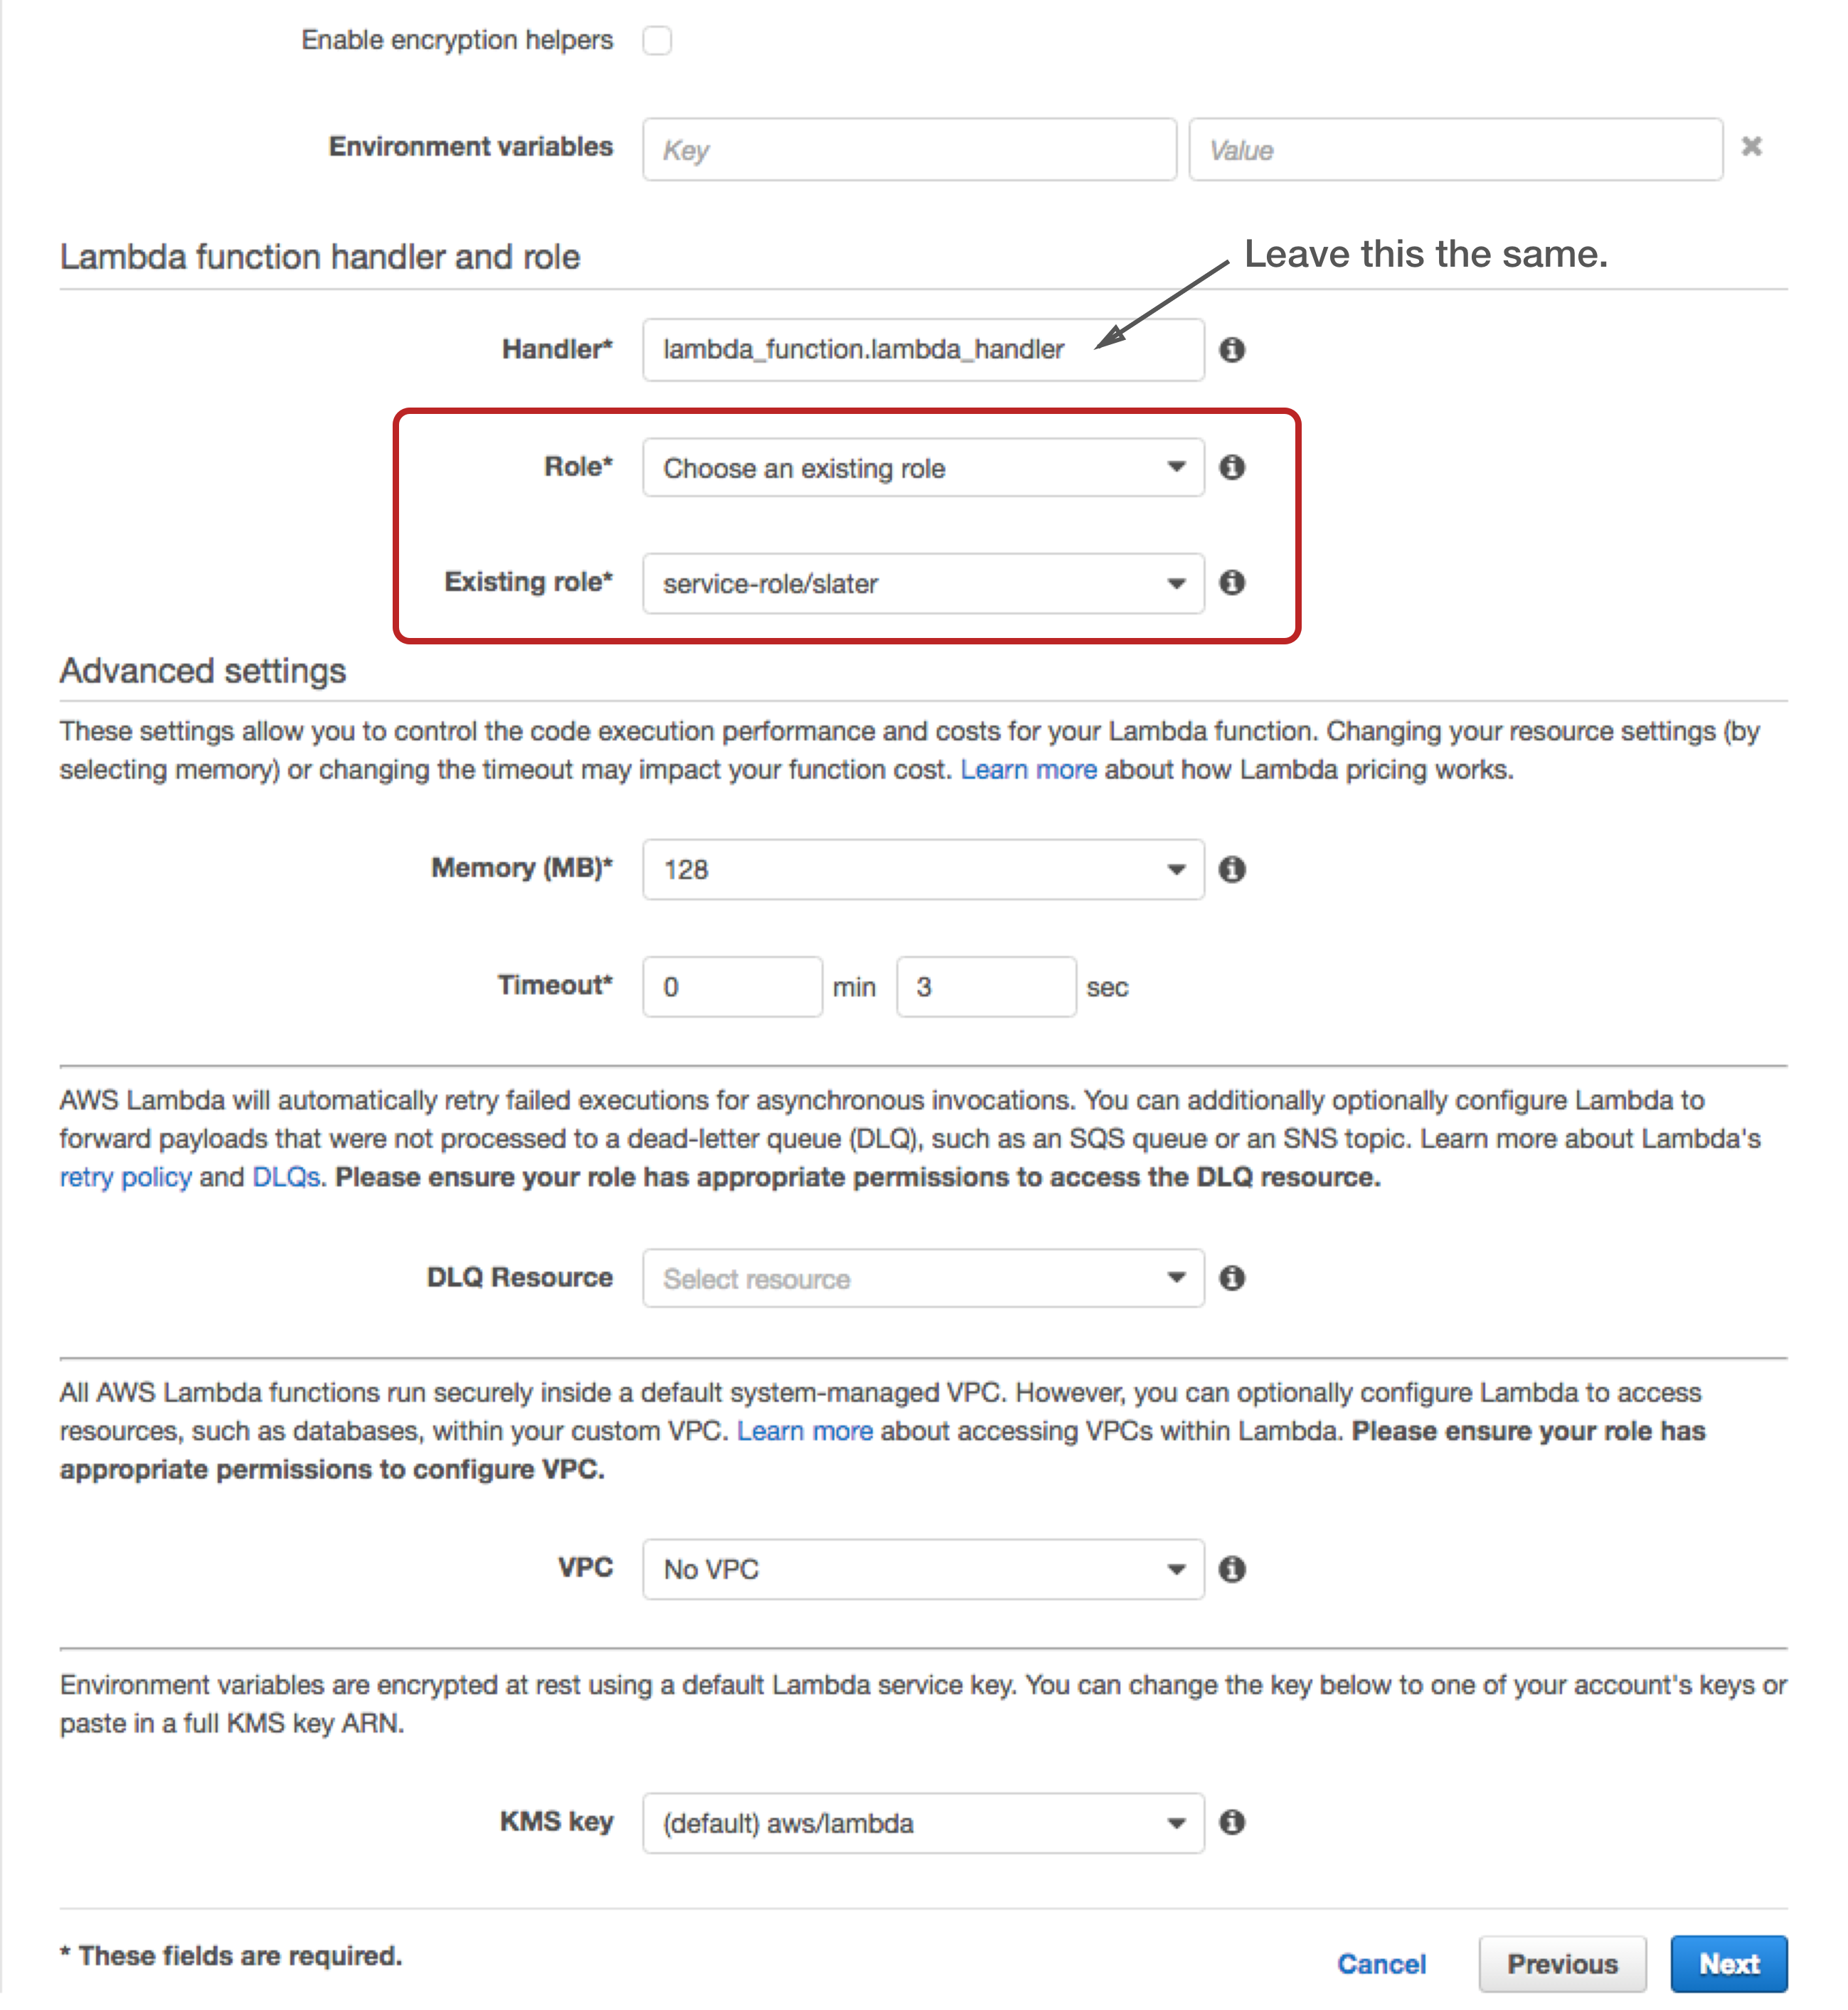
Now let’s look through the rest of the configuration for our newly created function. The handler name is important, but since we didn’t change the name of the default function, we don’t need to modify this. The only other option you might have to change is to either create a new role, select an existing one you have. Roles refer to IAM (Identity and Access Management) roles which configure the permissions for your function. Since the function does not need to interact with other AWS services, creating a simple role will suffice.
We won’t go into the Advanced Settings in this post, and the defaults are fine for this straightforward function. In future posts, we’ll look at using VPCs and DLQs!
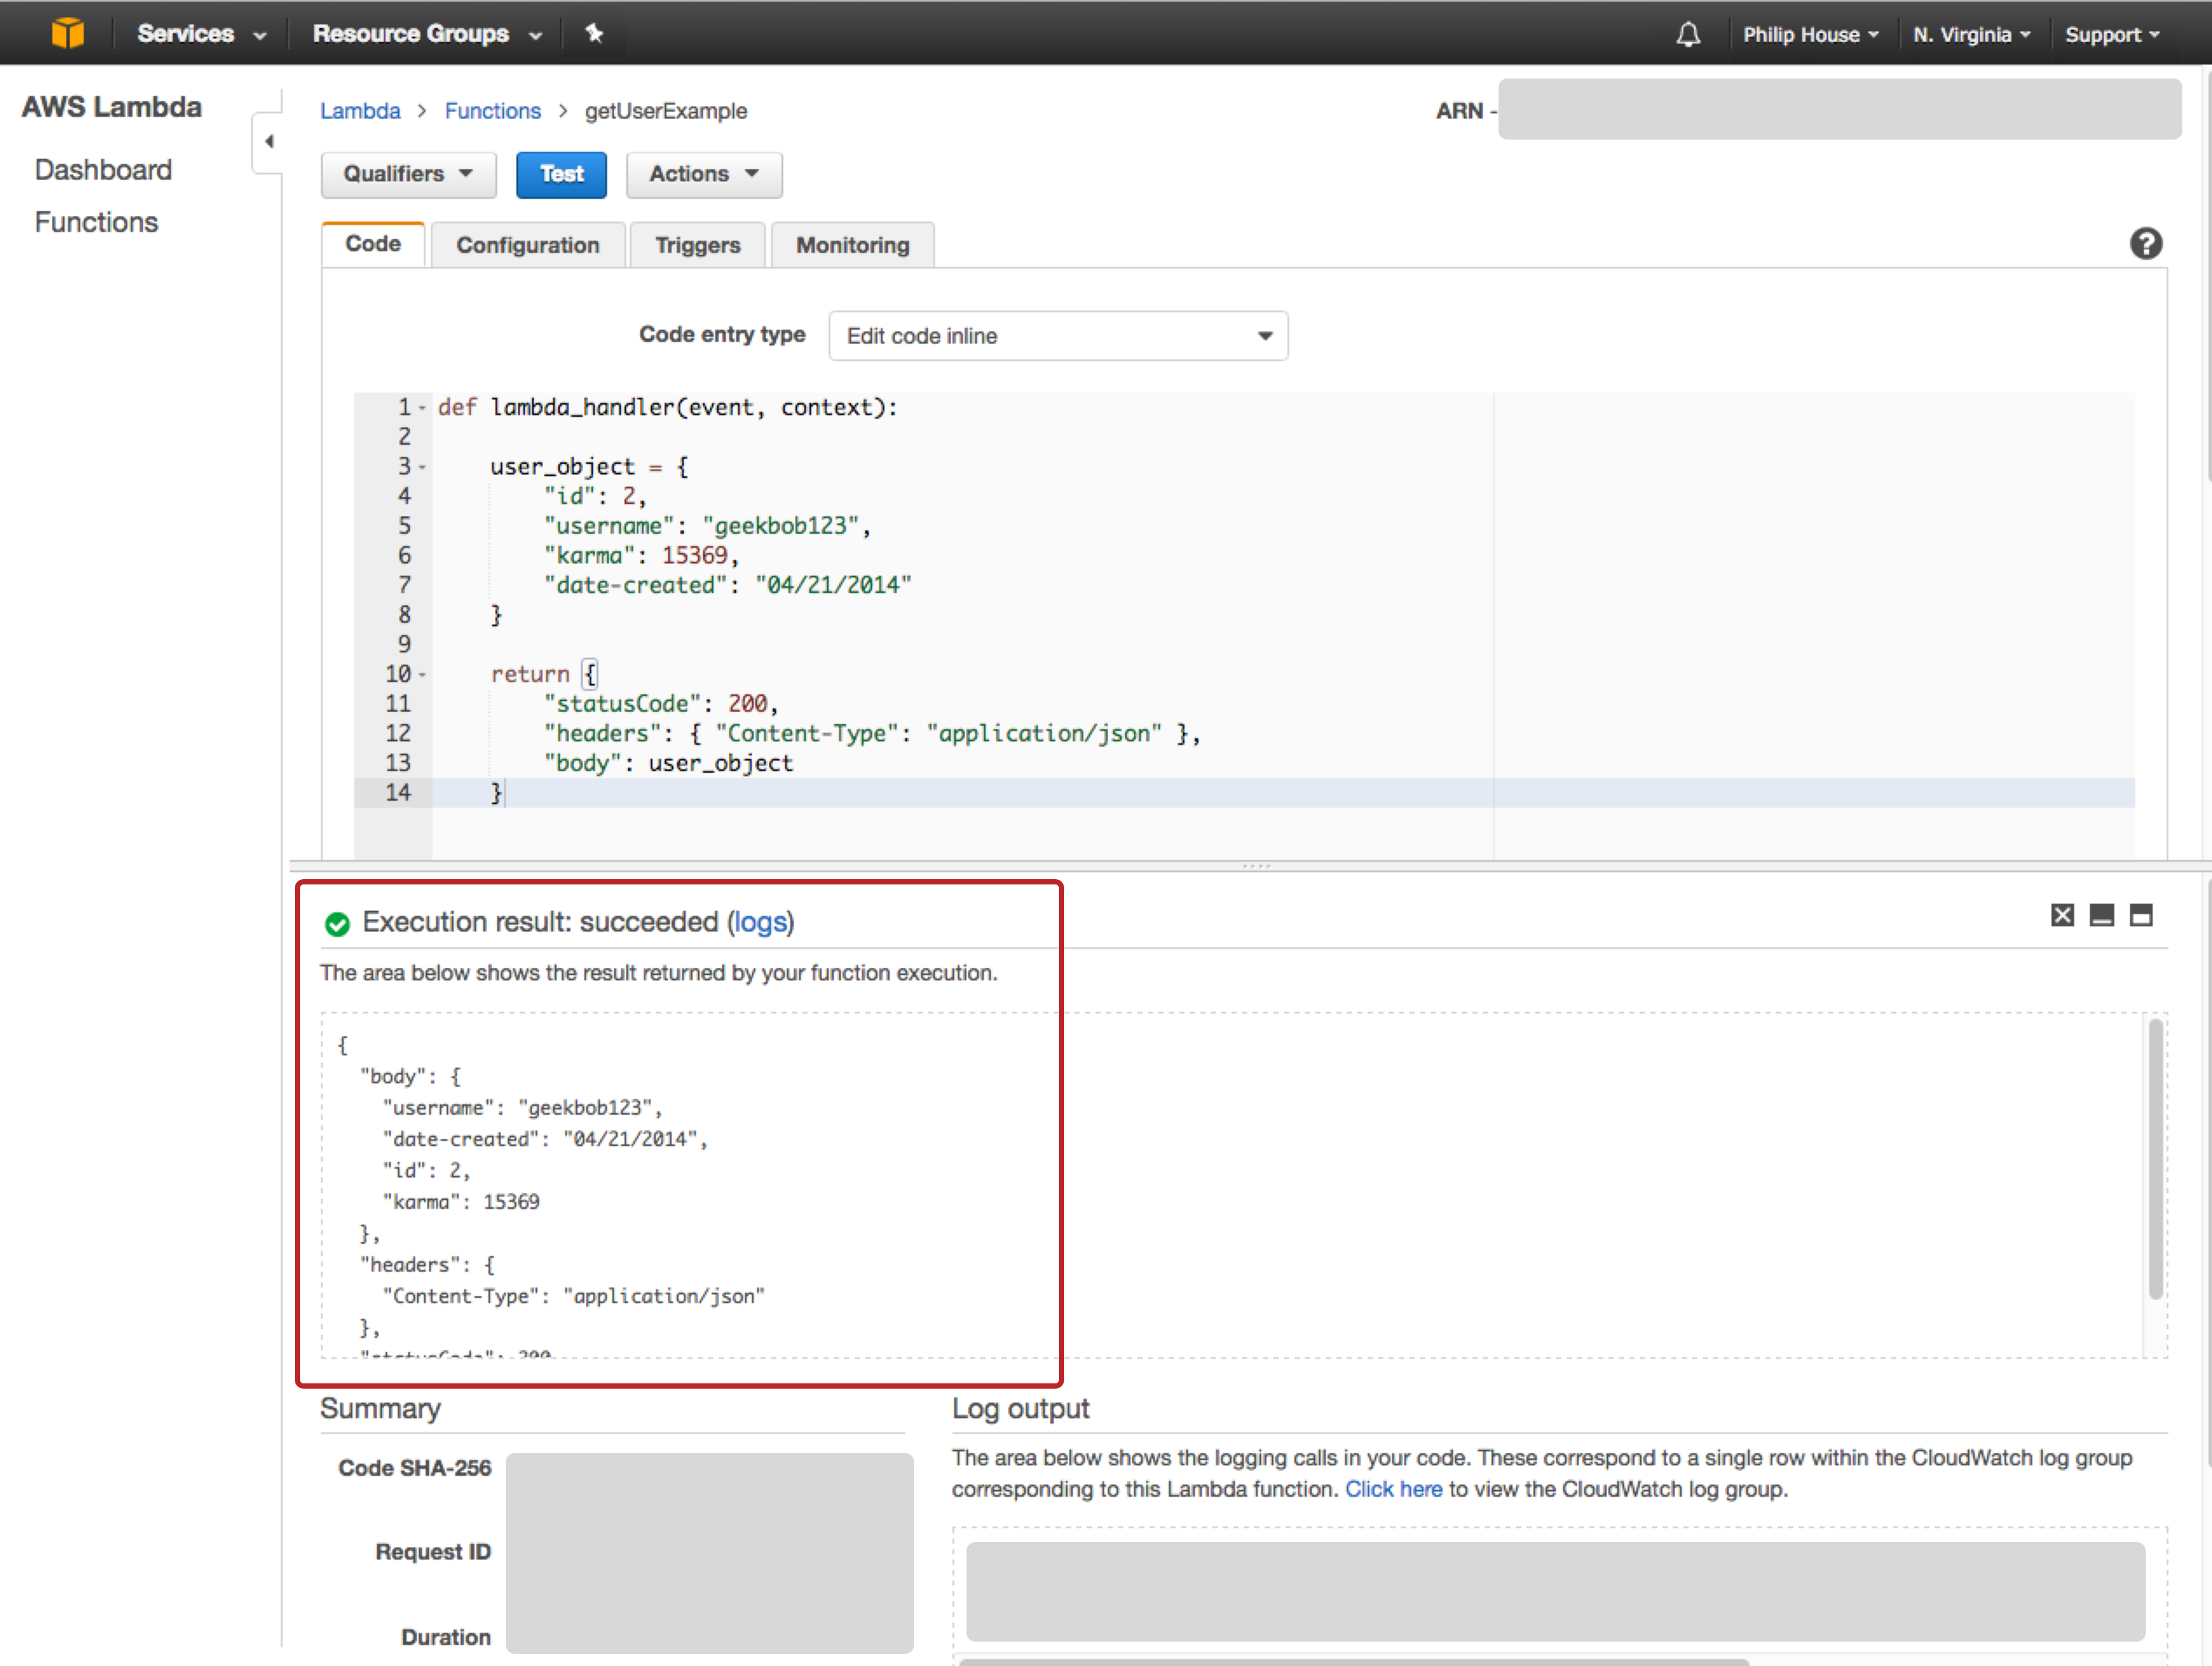
Once you go forward, you can review and then finalize your new Lambda function. If you want, you can test it as well. You will be prompted for the input, and the default Hello World json works fine. If you set it up correctly, you should see a successful output like the one below.
API Gateway Setup
Let’s jump to the API Gateway service page on your AWS account and create a new API.

In the next configuration step, choose ‘New API’, and then set it to whatever name you’d like. Once you click ‘Create’, you’ve created your new API! Now it is time to add endpoints and methods that will hook into the Lambda function.
Before we get into that though, let’s quickly go over some terminology inside API gateway so things don’t get too confusing. Resources refer to the URL paths that your API will listen to. For example, let’s say I want to create a new endpoint at /login that points to a Lambda function. I would first create a new resource with the path /login before going on to add a method.
Methods refer to the HTTP method type that a particular resource will listen to. For example, you might want to have different Lambda functions called for the POST and GET methods for the /users/ endpoint. Once you understand this small distinction, the rest of the API setup is pretty simple, so let’s get to it.
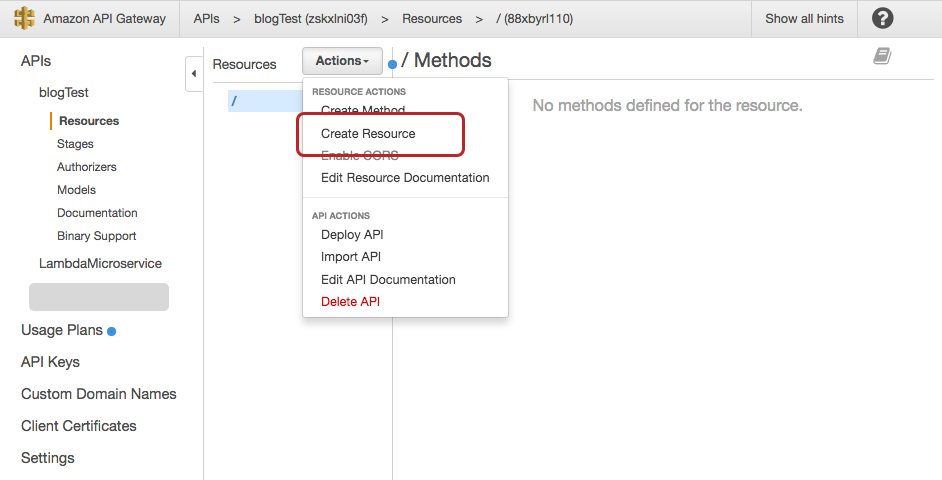
For this tutorial, let’s say we want to create a new endpoint with the path /users. Click on ‘Create Resource’ to move on to the configuration screen for setting up the new path.

The two fields to care about are Resource Name and Resource Path. You can use my defaults, or create an endpoint to your liking here. Don’t check the proxy integration flag, and CORS isn’t necessary as well. If you want to change these later, you can always reconfigure this whenever you want.
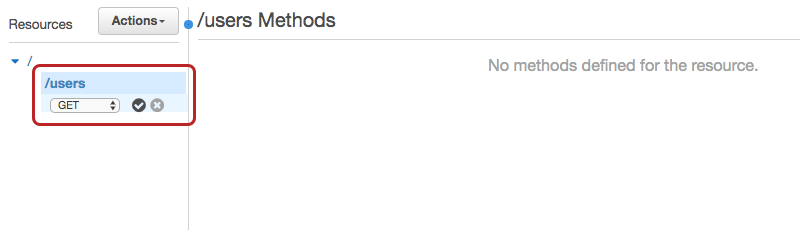
Now that we have a working resource, it’s time to attach a method to it. First, make sure that you have the newly created resource highlighted before going to create a new method. Add a method will bring up a dropdown as shown below - from there, choose GET and confirm your selection.
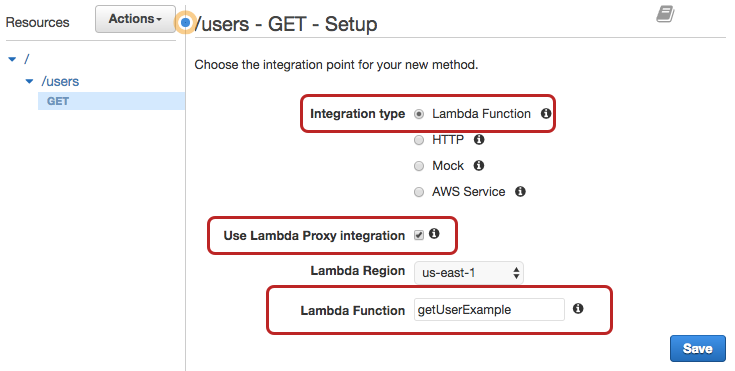
The wizard then brings us to choose the final few factors, the Integration type, the Lambda Function name, and the Proxy integration flag. Check Lambda Proxy integration and fill out the Lambda function field with whatever you titled your function to be (it should autosuggest).
We are almost to a working endpoint! There just a few more configuration details we will want to take care of first. For example’s sake, let’s remove all types of authentication - using the Authorization headers and API keys are for another time. To remove these, go to the Method Execution window by selecting GET in the left panel.
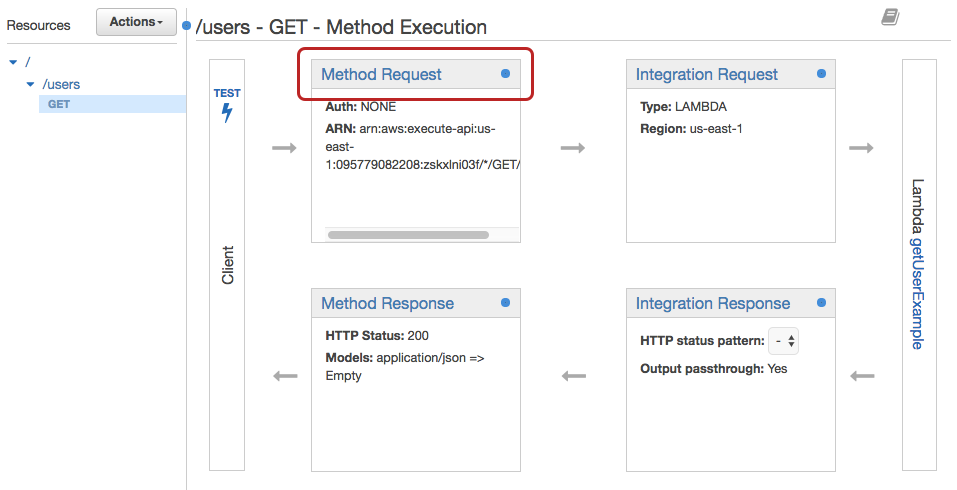
Select Method Request as highlighted above, and then you should see a configuration screen like the one below. Change the Authorization field to NONE and the API Key Required field to false. Save these changes, and then return back to the method execution page.

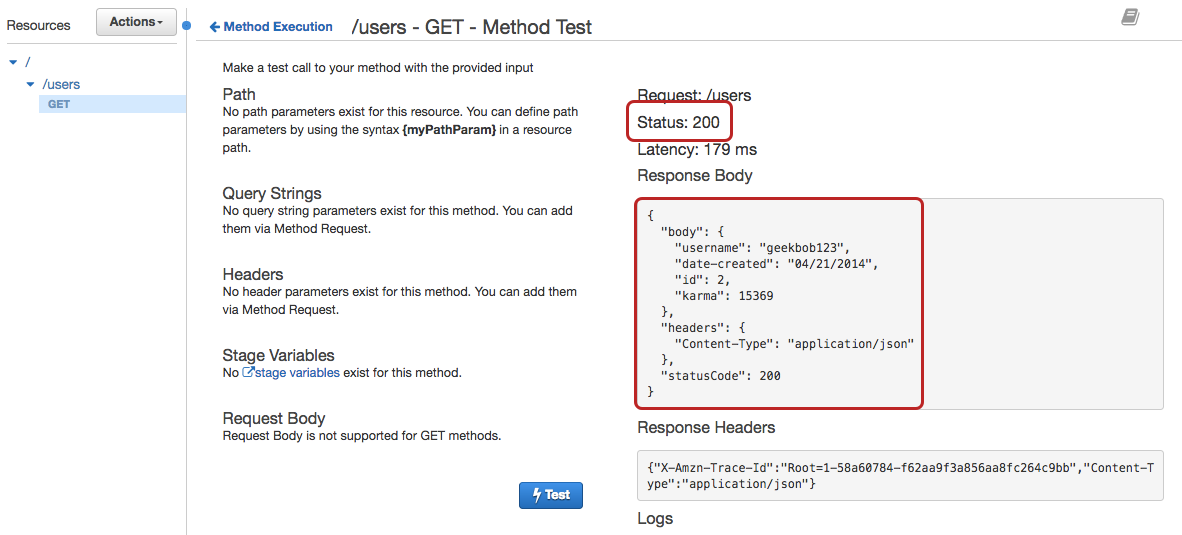
It’s a good time to test and verify that things are working as expected before we deploy the app. AWS lets us do that by clicking the Test button in the Method Execution. It will take you to another window where you’ll have to click Test once more. If all goes well, you should see a 200 status code, and the JSON body we defined earlier.
Once you’ve confirmed that your changes work, it’s time to deploy your new endpoint so that you can access it from the outside world. Under the Actions button, one of the options is to Deploy API. A modal will pop up and ask you to choose a deployment stage. If this is the first endpoint you are deploying, your only option will be to create a new one, as shown below:

Again, these values are all up to you so fill them in however you’d like. In a real production environment, it’s likely that you might have 3 stages (dev, stage, prod) to allow for you to test changes safely but that’s not important for this tutorial. Deployment Description is useful if you want to look back at your history of deploys, but again it’s not important in this tutorial.
Once you deploy, you will be taken to a stage editor that will show you many configuration screens. The important thing to notice now is that you have a URL that you can begin to access your endpoint. Navigate to the endpoint you created through the drop-downs in the stage editor, and the interface should present you with a working URL.

The final step is to now confirm that your endpoint works. If you followed this tutorial, it is as simple as copying the full URL and pasting it into your browser. You’ll get the JSON return value that you previously saw while testing out the gateway. You can also test it in your command line by running the following:
curl <aws url here>
Once you see the results, you’re all set! You can begin to make more complicated APIs for all of your projects.
Debugging
If your request doesn’t return what you were expecting, here are a couple things you can try to solve the issue.
If there is an error message that says something along the lines of Internal Server Error, this is most likely because of a bug inside your Lambda function OR because of a interface mismatch between Lambda and API Gateway. Revisit the section on making sure that your Lambda output can output successfully into the gateway.
If you see an error message about Missing Authentication token, it’s most likely because you didn’t disable all authentication. Revisit that section above to make sure you’ve disabled both API key authentication and IAM authentication.
If you’re still stuck after this, comment below and let me know! I’ll help however I can.